>
Set up mnsX
Set up mnsX
Please follow the guide from top to bottom. In the end, your new mnsX will be registered and set up, and you will know how to handle it. This guide is divided into three parts. Each part starts with a video, and below the video, you can find super detailed information.
The first part provides basic information about mnsX: what is in the box, how to turn it on/off, buttons & LEDS, how to switch between BL and ANT communication, and how to charge.
The second part guides you through a new mnsX registration process. It covers how to pair mnsX with your phone, how to register it, and what steps to take during the initial setup after registration.
The last part provides information about how to wear mnsX.
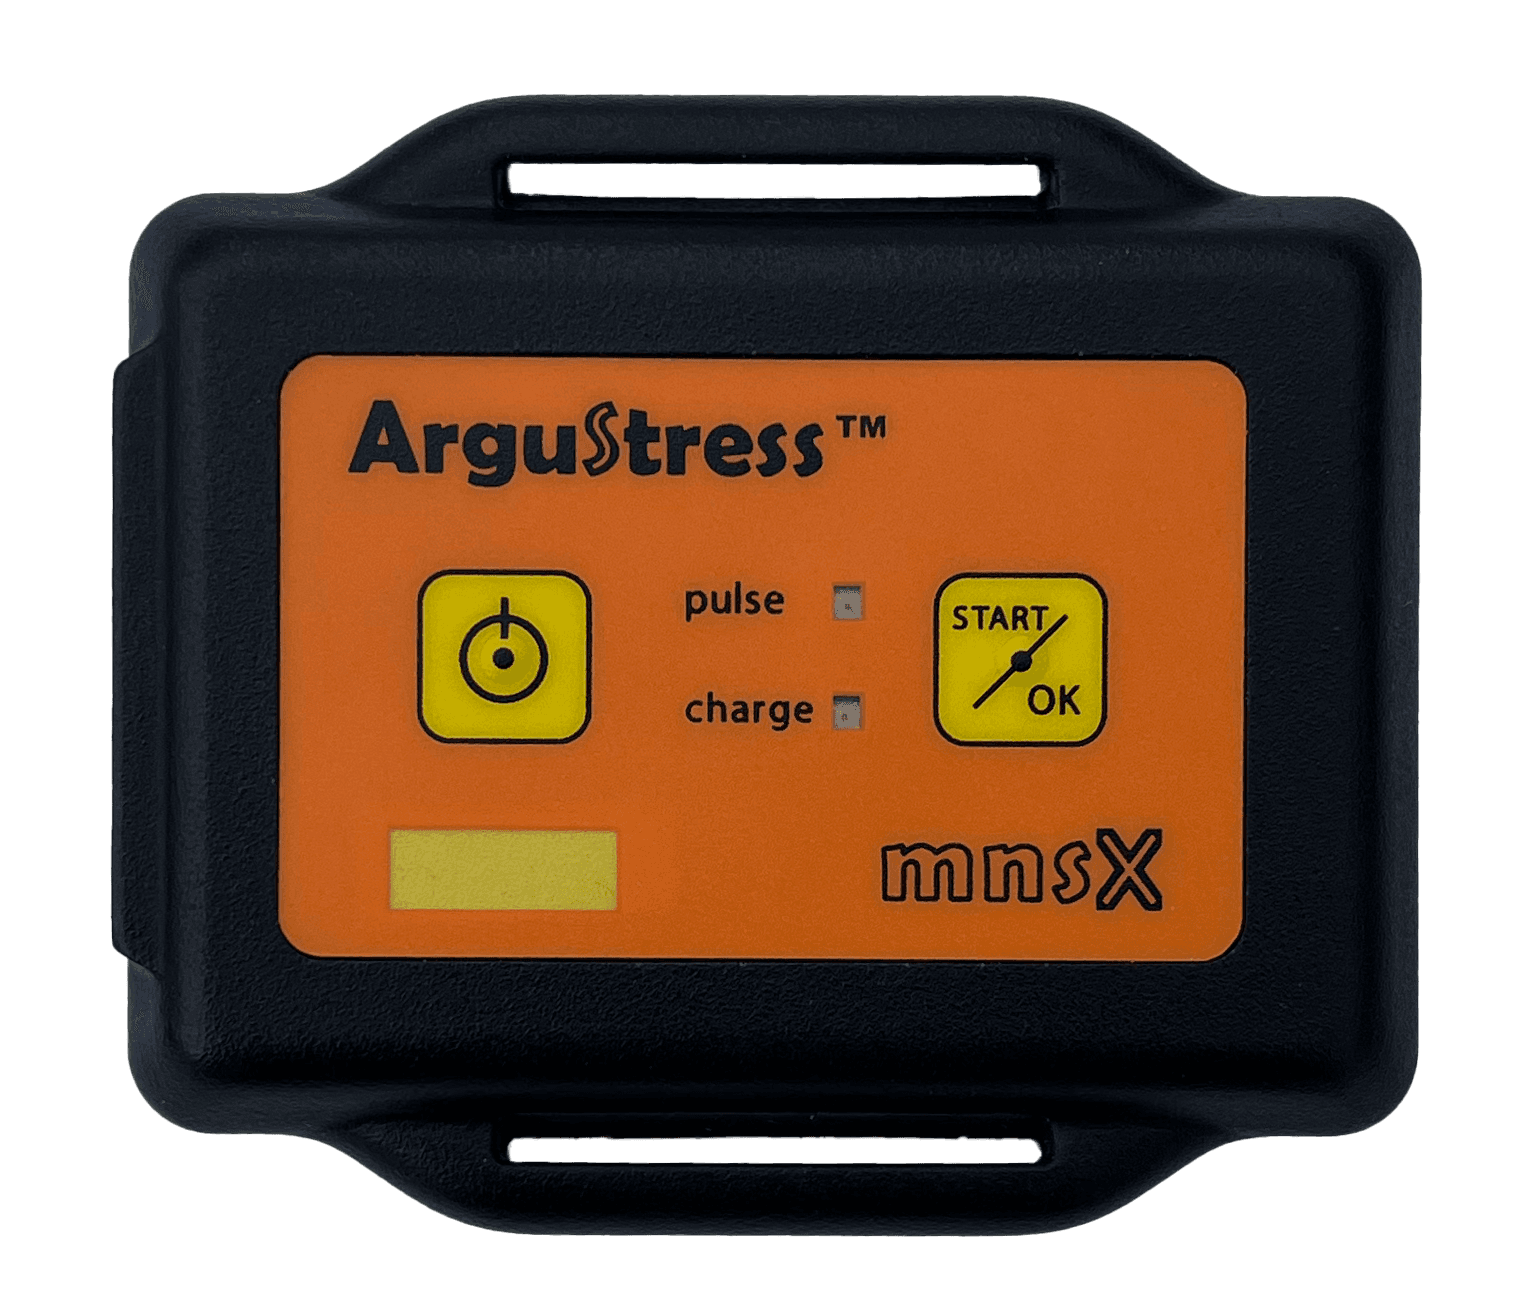
mnsX anatomy
What is in the box?
In the box, you will find your new mnsX, with a unique ID on the front, a USB 2.0 charger, and a long strap that can be cut to your optimal arm size (this option was chosen due to significant differences in arm sizes), loops for the strap and a small surprise!
Buttons & LEDs
mnsX has two buttons, POWER and START/OK, and two LEDs, PULSE and CHARGE. mnsX notifies you by different PULSE LED blinking and different vibration lengths. Please keep in mind that whenever you press a button, mnsX vibrates a short. That doesn't count as a vibration in the guide!
TURN ON – press the POWER button until mnsX starts vibrating.
TURN OFF – press the POWER button until mnsX vibrates three times.
START RECORDING - turn mnsX on, wait until the PULSE LED starts blinking super fast, and then press the START/OK button once and wait for a long vibration. It means mnsX starts recording.
STOP RECORDING – turn off the mnsX.
BLE PAIRING – turn mnsX on, wait until the PULSE LED starts blinking super fast, and then press both the POWER and START/OK buttons until mnsX starts vibrating like a train (you will see what I mean).
HRM PAIRING – turn mnsX off, then press the POWER button (super long) until the PULSE LED continuously glows. Four PULSE LED blinks after the glow means mnsX found your HRM, and two means it couldn't.
mnsX's modes
BATTERY MODE - when you turn on your mnsX, it switches to BATTERY MODE and indicates the battery level with 1-5 PULSE LED blinks (20% / blink). After BATTERY MODE, mnsX automatically switches to BLE MODE.
BLE MODE - when you turn your mnsX on, wait until the PULSE LED starts blinking super fast. In BLE MODE, you can connect to the mobile application. mnsX uses BLE communication.
RECORDING MODE - while in BLE MODE, press the START/OK button once and wait for a long vibration. If mnsX can connect to your HRM, the PULSE LED will blink in sync with your heart rate. If the PULSE LED is not blinking, there may be HRM connection issues. Try moistening the HRM sensor pads. mnsX uses ANT communication.
TURN OFF MODE - if none of the LEDs blink, and you press the START/OK button once, and there isn't any vibration, it means mnsX is turned off. (This is how you can check whether mnsX is on or off when it is under your clothes.)
!!! Note: mnsX turns off automatically after 10 minutes, when you stop the Connect IQ application, or if there hasn't been any heart rate data in the last 30 minutes, or after 7 hours of recording!!!
Charging

Insert your mnsX into the charger with the contact side (POWER button side (left side)). You can do it while the strap is on! If mnsX is charging, the CHARGE LED will glow. If the LED turns off, the mnsX is fully charged!
mnsX’s battery life is around 8 hours. You can check the battery's charge level in BATTERY MODE when you turn on your mnsX, in the mobile app, or in the Connect IQ applications.
Important: Please DON'T store mnsX with a dead battery for a longer period. Always charge the battery fully and recharge it every half-year!!!
Register new mnsX
Registration
1. Download the mobile app: please download the mobile app from the App Store (here). Currently, the app is only available on iOS mobile devices. Versions for iOS tablets and Android are coming soon!
2. Open the app, then click on the LET'S GO! button, and select Register new mnsX! in the bottom right corner.
3. After reading and accepting the privacy policy and terms of use, it's time to pair your mnsX with your phone. Each mnsX has a unique 5-digit number located on the front of the device. Enter your mnsX number, press the SEARCH button, and follow the pairing instructions.
4. Enter your personal details: nickname, year of birth, gender, height, and weight. mnsX requires these personal data (except for the nickname) to provide you with more accurate feedback. These personal details are the only data we store about you.
5. Enter your e-mail! Important, we DO NOT store your e-mail address. We generate an unrecoverable code. (For more information, please check our Privacy Policy).
6. Enter your password. It has to be 6-15 long, and you can use the a-z, A-Z, 0-9, -_!@#$%* characters. The password is case-sensitive.
7. Finishing the registration process: Before clicking on the REGISTER button, please make sure your internet connection is stable and mnsX is close to your phone. Do not turn off your mnsX or close the application during this process. Registration will be completed quickly!
8. If the registration was successful, the next step is to log in to your profile and complete the initial setup. If any issues occur during registration, please try again! If the problem persists, please .
Initial setup
mnsX requires setting a few parameters before the first training.
1. Log in to your profile in the mobile app, scroll down to the bottom of the main screen.
2. Click on Settings.
In Settings, you will find a checklist. All items must be set for mnsX to work properly!

Sports Activity
Let’s set a sports activity first!
1. On the bottom menu bar, you can choose between cycling or running. Choose the one you prefer.
2. Click on the ACTIVATE button, and a few options will appear.
3. You can choose between outdoor or indoor, and road or cross. These settings affect the behavior of mnsX and the Garmin Connect IQ app, so please always make sure you set the correct ones!
What if you are a triathlete and doing both? We are working on it! The triathlon option is coming soon!

FTP & Power Zones
Let’s set the power zones for your chosen sports activity. If you are a triathlete, please set both cycling and running power zones!
1. In Settings, choose the bike or run icon at the bottom menu bar.
mnsX uses seven power zones. You can calibrate all of them using your 20-minute CP (FTP).
2. Click on the icon on the Bike/Run Power zones card and scroll down to the bottom.
3. Click on Calibrate Power Zones button, enter your 20-minute CP (FTP), and click on the CALIBRATE button. If you would like, you can set or adjust the values for each zone individually by clicking on the values!
4. Make sure your power zones are valid! You can check and set it above the power zones on the Bike/Run Power Zones card.

HRM Pairing
Let’s pair your HRM and mnsX!
1. In Settings, choose the heart icon at the bottom menu bar.
2. Click on the ADD NEW HRM button, and follow the instructions! Make sure your HRM is active and close to your mnsX because mnsX always pairs with the closest active HRM.
3. Don't forget to enable HRM on the top card!

HR Zones
1. In Settings, choose the heart icon at the bottom menu bar.
2. Click on the icon on the HR Zones card and scroll down to the bottom.
3. Click on Calibrate HR Zones, enter your max HR, and click on the CALIBRATE button. If you would like, you can set or adjust the values for each zone individually by clicking on the values!
4. Make sure your HR zones are valid! You can check and set it above the HR zones on the HR Zones card.

Save
The last step is saving the new settings!
Click on Save button in the top right corner!
When you change some settings, never forget to save it, because the mobile app won't update your mnsX.

How to wear mnsX
If possible, please watch the video. It's easier to show than tell!

Which Arm — You should wear mnsX on your upper arm. It doesn't matter on which arm, if you are using Garmin Edge. However, if you are using a Garmin Watch, I suggest wearing your mnsX on the same arm as your watch. This will improve communication between mnsX and your Garmin devices.
Placement - This is the most important! Start by gently grabbing your biceps. Place your fingers between your biceps and triceps, then slide up your fingers until your pointing finger reaches the bottom of your deltoid. With your pointing finger, you should feel a little valley surrounded by the three muscles. Put your middle finger right below the pointing one. The right spot for your mnsX center should be under your middle finger.
Around the perfect spot, a 1-1.5 cm difference is acceptable, but always try to be as precise as you can!
Direction - The POWER button should be at the top. It helps mnsX communicate with your Garmin more easily.
Band - In the box, you will find two loops and one long band that you can cut to the appropriate size. I know it sounds funny, but this is the best option considering the significant differences in arm size among road racers, amateurs, and track athletes.
Please select the appropriate length for your band. Your mnsX should remain in the same position throughout your entire training session. However, if the band is too tight, it may become uncomfortable during a long ride/run. Please keep your skin clean under mnsX. Body lotion and sun cream can make your skin slippery.
Shop
Subscribe for updates

© 2021-2025 ArguStress Inc. All rights reserved.
Privacy Policy | Terms of Use